While looking into Weta Digital works, I found this article on Mulan set building specifically the massive digital city. One of the videos shows how Weta broke up elements of real life Imperial buildings and building blueprints to create a mix and match type collection of assets. I can definitely see this being useful for large scale projects, as you can re-assemble a limited number of parts into so many variations, creating a greatly increased amount of unique assets with less manpower required. In terms of world building, this is a key concept that I want to take on board and be able to use in future projects(especially since I tend to take a while when creating assets).
Version 2 of these final assets. Melissa looked at what we submitted and gave feedback on what she wanted changed. Common thread was "look at the concept art" which I have been, unfortunately for me the art is not accurate to what is being requested so I'm not surprised none of them were accepted yet.
Thicker spokes and wooden ring, bigger rivets but less of them.
Feet weren't curly enough (called it) and the spout needed to be thicker and less straight up and down. The feet are still tricky for me as the concept art is not that great and did show a pointy end so we will see what she thinks of this attempt.
Barrel still wasnt "defined" enough and I accidentally put the wrong shape taps in. I am legitimately frustrated about this model because I spent so much time tweaking and all I get told is "make it more defined like the concept art", which was the 2nd barrel I made that was rejected weeks ago.
Shrunk the cubicle height so its not floor -> ceiling and added some gaps to break up the solid walls a little.
Big push finishing assets today(Subject to Melissa's approval). Finally made the cubicle walls 3D (door is coloured just for this pic). Thankfully this only has to be basic as it is only a background feature.
I realised that I had created the wrong kind of tap and so had to remake it. Im quite pleased with how they turned out.
Just a final version of the dinged up bathroom trashcan.
Curly foot style for Pavo's bathtub, might be too pointy for the desired style however.
Taps for the bathtub, I used some of the sink tap assets and modified them a little.
I offered to take over creating the bathtub for Vinnie, as he was tasked with setting up the cameras for the 3D animatic. Preliminary bathtub design and first attempt at a curly foot. Trying to work out something so basic sounding is proving more difficult than I thought originally. I will be looking at a Fleur de Lis for inspiration when I have another go at it.
Spent a lot of time renaming and grouping all my assets for export to blender. Ian initially said to use .obj but I found that doesnt maintain the groups from maya, instead it puts everything seperate.
This is just my door asset:
Most of my assets are broken into many groups for UV unwrapping purposes so this is not a viable option for me. I tried .fbx and imported that back into Maya with success. Next step was downloading Blender and testing the import there with the following result.
Thankfully this imported perfectly into blender which means vinnie/sarah dont need to build the set before jumping in with cameras etc. I think my next free chunk of research time will be looking into the rendering side of blender so that I dont feel completely useless in the final stages of this production.
After taking a break yesterday due to pain in my fingers, back into it today for a long day of modelling to hit tomorrows due date.
One bathroom window although Im thinking more of a frosted glass would be more appropriate for privacy sake.
Notes on the current animatic version
The context of the two goldfish at the end is lost due to cuts at the beginning
There is no solid link between Pavo sitting in the bath and the rest of the clip - nothing suggests he's worrying about a date
James commented it feels too safe(I've been saying this since the animation won the class vote) and doesn't feel cinematic to watch in its current form. The camera movements feel a bit cheesy and 4th wall breaking(unrealistic, ruining immersion).
Opening scene doesn't really link the water overflowing to his anxiety manifesting, just looks like water is overflowing. There is a lot of time spent looking at Pavo in the bath like a creeper.
the waiter is already angry with no reason when he appears, instead of starting to get angry as Pavo takes too long to order.
for the beginning perhaps having the water seep out of the walls and drain from the toilet/bath could show how unnatural it is, then cut to Pavo standing in the mirror straightening his tie and the reflection showing no water anywhere. Pavo framed by the mirror could transition nicely into Pavo framed by the restaurant door. I wonder if flipping to a POV sweep of the restaurant would work better in that moment, showing how full the restaurant is.
the shot arrangement around Pavo looking out of the bathroom at betty is a little odd. I think having cuts between his face in the porthole and a close up on her sadness is more efficient than the current setup.
i think having little cutscenes for the credits could show Betty slowing joining into Pavo's life - purchasing and adding a 2nd fish to his bowl, adding a 2nd toothbrush to the cup at his house etc.
Position Research (A little late in the process but oh well)
3D Artist Job Description Template (betterteam.com)
We are looking for a creative individual to join our team as a 3D Artist. The responsibilities of the 3D Artist include creating still and moving images using computers, creating 3D models of products, and managing multiple projects while adhering to deadlines. To be a successful 3D Artist, you should be detail-oriented, flexible, and a good team player. Ultimately, a top-notch 3D Artist is creative and artistic with a strong working knowledge of color, texture, and light as well as industry-standard software.
3D Artist Responsibilities: Using 3D modeling, texture, mapping, and other techniques to create graphics, visual effects, and animations. Collaborating with Animators and other artists and attending meetings to discuss ongoing projects. Understanding the project requirements and conceptualizing creative ideas. Creating storyboards to visualize scenes and create a realistic environment for movies, games, and other visual effects. Receiving feedback from Directors, Animators, Designers, and clients, and editing your creations based on the comments received. Reviewing 3D arts and recommending improvements. Creating 3D sculpts and assets to meet artistic standards. Troubleshooting any problems that arise during work on a project. Meeting with clients, Designers, and Directors to discuss and review projects and deadlines.
3D Artist Requirements: Certificate, Associate's degree, or Bachelor's degree in Graphic Design or a related field. 3D Artists in Medical illustration must have a working knowledge of Biology. A strong portfolio of previous work and completed projects. Strong working knowledge of industry-standard software, including 3ds Max, V-Ray, SketchUp, and Maya. Excellent creativity and artistic skills. An eye for composition, realism, texture, color, and lighting. Good communication and teamwork skills. Excellent time management skills. Willingness to remain up-to-date on the latest creative software and hardware.
From 90seconds.com (How to Become A 3D Modelling Artist)
Earning the Role
The portfolio will matter.
Nobody is going to hire someone without first seeing their prior work. Like many parts of the arts industry, the portfolio is going to be key. Be prepared to show off some high-quality work when people ask to see the portfolio. Always add to it to show skill advancement.
How is the experience?
Because there are many different ways to enter the 3D modeling space, many people start off in other industries such as architecture and engineering. It is perfectly acceptable to start here and move to film; however, be prepared to discuss how the skills learned in those other industries will translate to movies.
Degrees are key.
Education is important for the 3D space because the technology is always changing and improving. Possessing a degree in the 3D modeling space will help earn this coveted position.
Play to Your Strengths
Build on experience.
Because there are so many ways in, people should remember to put their experience to work. Thinking outside the box is okay, but when it comes time to put the final project together, take advantage of what prior experience has taught you. This could be from the healthcare industry, the architecture world, or the film world. The final project should reflect the pinnacle of this experience.
Think about technology.
3D modeling relies heavily on the capabilities of the technology being employed. Some people are better with computers than others. If technology is a challenge, delegate this task to someone else.
Don't be afraid to use the hands.
Sometimes, putting together a 3D modeling shot might require some concrete geometry first. Breaking out the pen and paper or using clay to model a challenging shot is perfectly acceptable. Get the shot right the first time.
Diversify
The 3D modeling industry is growing quickly and while many people want to enter the world of film, it is okay to start somewhere else. Using 3D modeling for architecture, healthcare, and engineering can help to build someone’s resume to eventually enter the film world. Within the film industry, people might be interested in taking a job as a storyboarder to help see how scenes fit together and how 3D modeling brings those scenes to life. Even a job with the lighting department can help give a unique view that helps people visualize scenes in 3D. The graphics department will always be a great gateway to the world of video editing and 3D modeling as well.
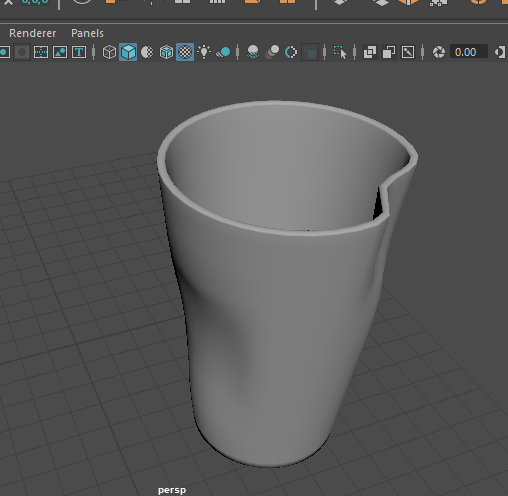
Barrel version 2. Melissa wanted a more exaggerated round shape so I tried a simplified barrel using the technique of drawing a curve and then hitting the rotate 360 tool in Maya.
Turned out alright for a basic barrel. I was planning on adding plank outlines via texture but melissa didnt like this one much either and wanted one with the straps sticking out more and to return the physical wood planks, so it was onto version 3.
I actually really like how this one turned out, I bit the bullet and made the straps as separate meshes, following a tutorial I found on youtube: https://youtu.be/6lROEOwgTPU In the long run this was better for texturing purposes too as trying to separate the wood and metal textures on a single UV export was really tricky and not very clean. The only concern I have is that its not "stylised" enough for melissa/max and their creative ideals.
One asset done, although I think I might try and remake this using the same way we created the wineglass last year, drawing a contour line then rotating 360 to make a 3D object from it. Some of the extrusions to make the panel gaps have gone wonky due to the fact its a cylinder shape, and the horizontal roundness isnt very smooth either. Chucked just a basic brown shader on to help visualise how the gaps will look.
Todays battle - BOSS aka Bifrost Ocean Simulation System ( yes I realise I mentioned yesterday I would work on the particle splatter but I got distracted by the ocean sim lol)
I have found this series of tutorials to begin following:
So far it is a lot simpler to set up than using particle emitters but I guess that makes sense as it is essentially just a plane deformer and not a 3D object.
All the major adjustments are done through the BossSpectralWave tab that is created when you select the Plane mesh and hit create spectral wave in the Boss Editor(found under the Boss menu in the FX menuset). Important note: Make sure the project Working Units(Settings) is set to centimetres as the BOSS system uses 1cm as 1m of ocean for scale purposes. When setting up the Global attributes, match the Patch Size X and Z to the dimensions of the plane you are using to avoid the sim having to calculate waves that arent part of the visible area.
Objects that are intended to be used as colliders are added by selecting the mesh, then hitting "add geo influence" on the Wave Influences side of the editor. Caching is very simple, just hit the cache all button in the editor. It even auto switches between exporting and reading from the cache for you once complete. Cache folders are set under the same SpectralWave tab as the rest of the configurations.
The initial creation complete with aistandard surface shader. The human standin is there to try and create ripples but I am still trying to work that part out.
This next shot was adding foam to the simulation. The tutorial I was following mentioned that you cache the water sim first and it adds the foam afterwards. This shot was with the Foam Attributes Cusp Min set to 0.1
This one is the Cusp Min set to 0.05
Personally I think I like the 0.1 setting better
Further in the tutorial series he showed adding the object mesh as an influencer on a seperate wave solver in the BOSS editor. I did that and tweaked a few settings but currently my ripples look ridiculous. There is a huge delay from my guy moving and the ripples forming, then at the end of the sim they go crazy.
As seen here, my guy is off screen and the ripple trail is still mid screen. That turbulent patch is where he started and so far I havent figured out what setting is making that happen.
Managed to get the amplitude tweaked using the BossWaveSolver wave height and size sliders but there is still the large follow delay that I need to research solutions for.
I think part of the issue is scale - the human is moving too far in too short time. I swapped out to a prebuilt boat and got this result.
Im wondering if the cross ripples are due to the fact i only have a single 50x50 plane and they are bouncing back in for some reason.
To scale up the ocean I looked into using a projected displacement map using the cached BOSS files and hypershade. **Important note - all water simulations must be done before this step** Change the height and width subdivisions of the original plane to 1024 and cache the simulation. Create a new plane with the default 10 subdivisions and scale it up to the same size as the first plane using the polyPlane settings, not the transform settings. (The latter will make your displacement map not work correctly)
Apply the same aiStandardSurface of the original plane and open it in hypershade. Use the input and output connections button to show the shader in the graph.
Change the default link from Out Colour -> Displacement into an Out Colour -> Vector Displacement link and connect the displacement shader to the displacement node on the surface shader.
Select the place3DTexture1 object in the Outliner and rotate it to -90 on the x axis so the projection is facing downwards, and scale it to half of the Patch Size(in the SpectralWave settings). Go to the Out Connections by hitting the circled button.
Open the image box under Projection Attributes and right click on File and select add as projection. Navigate to the cache files, select the 1st frame and make sure the Use Image sequence is ticked. Hide the original simulation plane and when you hit render the low res plane should look the same, but with only 10 subdivisions instead of 1024.
Original simulation plane size
After creating a projection plane
Once this is working, you can resize the new low res plane using the polyPlane settings and the displacement will scale with it while keeping your subdivisions low.
To get some more deformation, under the planeShape -> Arnold -> Subdivision you can make it so that when the image is rendered, the plane will get subdivided for as many iterations as you specify. This does increase render time however. Change the type to Linear and adjust the slider, using the Render View to decide what you like.
overflowing water around a hand clamped on the side of the bath sim
test Pavo's "cough" particle splatter with viscous water sim so they splatter onto the table like paint
flowing 3d seaweed for underwater scenes
air particle emitter underwater to simulate the final fish breath bubbles as it gets submerged
fix the bathroom lighting for the overflow scene
wave crashing into restaurant bathroom
Trying to fix the noise from the lighting. This looks a lot better although dark(the speckles on the water are from the foam simulation - I have removed this now as I cant get it working with the custom mesh material). This was setting up an area light and the second image is 2 area lights on either side.
Im still not happy though so back to the drawing board. The hand blocks the water ok in this shot but I have tweaked some water settings and will see if that makes any difference.
soon as I get a decent light level the grain is back, which makes me now wonder if its something else causing it.
Tomorrow I will take a break from this sim and have a crack at the cough splatter as it looks kind of fun to try.
11hrs later, the final render for the latest animation. Unfortunately my lighting choice has added a lot of noise to the image so I am going to look into a different way to light it and hopefully get a nicer end result.
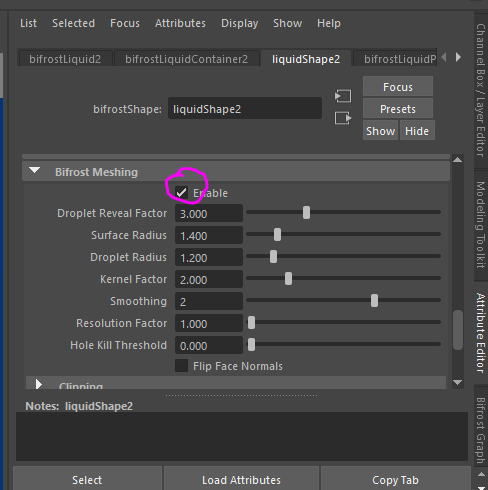
Fiiinally managed to get the cache working. After leaving my PC on over night and only getting 65 frames rendered in 10hrs I cancelled it and went back to problem solving the caching issue. Turns out there was a meshing tickbox on the liquidshape that needed to be enabled before anything was recorded (previously was getting empty caches). The playback is still a little slow but instead of taking 20mins to load through a playback it only takes 3-4mins.
Just did a clone scene and deleted all the sim objects, this is cached mesh only, so far so good.