Friday, 2 April 2021

BSA703 1/4

Using the original sim but bumped the expansion setting to make it overflow 


Using the Hypershade window to play around with the aistandardsurface assigned to the bifrostliquidmesh.

Milk preset coloured blue - too fake looking I think

Deep sea preset - Personally my favourite but not the opaque stylised look Max wants

Deep sea preset tinted blue and specular tweaks - getting closer, if only there was an opacity slider

90% clay preset added to deep sea (whoops too much)

Tweaked the clay back down, the colour is still far too navy though. Might have to reset and start again with the shader.

Lighter colour but also more transparent

Even lighter and more opaque, Im still not really satisfied with it yet but I think I will just do one final tweak then set the computer rendering as this is still just a test technically.

Couldnt resist, I think Im happy with that for now.


Tuesday, 30 March 2021

BSA703 30/3

 Return of the non-graph liquid sim (aka potential regret)

After a little hunt through the Autodesk forum, I found a suggestion to increase the emitterprops Expansion rate. First attempt I moved it to 1.0 with over the top results. I have also set the liquidshape to include voxels in the display and found the setting to make the mesh visible also.


Monday, 29 March 2021

BSA703 29/3

 Blue cocopops! For some reason Maya at campus doesnt have issues with rendering the particle mesh, I do wonder if this is because it is 2020 and still has the Bif1 object like the tutorials(it is merged into the graph object in the latest version)


Progress but the mesh still isnt forming something waterlike just yet. Im not sure whether this is a particle size issue or a particle amount issue but its frustrating due to the amount of time it takes to create a cache.

At this stage I am going to revert my home install of Maya back to 2020 and see if I can find some water specific tutorials to help with the meshing issue as my current tweaks dont seem to be doing much other than increasing the cache time.


BSA703 28/3

Progress! Turns out the graph editor isnt too tricky if you arent trying to insert it mid scene build. My problem earlier was trying to merge the easy tutorial way of creating water with the graph and thats why it wasnt working. I merged info from 2 tutorials to figure out what I know so far:

This gave me a basic intro but I found some of it still kind of confusing so jumped to:

The second one helped a lot more but both of them are still a little behind in terms of adding materials so I have had to use a little logical jumping to figure it out

What Ive learned so far:

Use middle mouse button to drag the maya object into the editor and create the Input node. Hit tab to bring up the node list and in this case I used the basic_particles_graph.


Right clicking on the node gives you the Explode option to expand the node.


This is where all the particle settings and manipulators get connected. Drag the other scene objects into the graph editor and connect them to the collider node to make the particles collide with them.

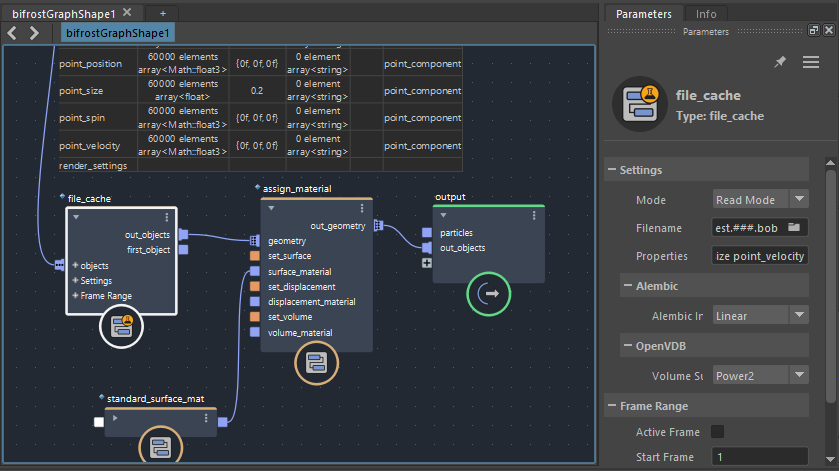
Caching - as simple as creating a cache node in the editor and switching between write and read mode. One issue I ran into was when choosing the name of the cache files, make sure to use the naming convention filename.###.bob(default bifrost file extension) otherwise it will only cache the final frame. this defaults to the windows home directory also so change it to the project directory cache file.


Place an assign material node in the final spot before output. Connect a surface mat and name it the same way the other aistandardsurface materials are named, and adjust the values. I used hypershade to get the material looking the way I wanted then copied over the settings. It was after doing this that I discovered you can right click the material node in the hypershade window and copy to viewport selection.


Current playblast:

It actually overflows a lot nicer than the other sim however these particles dont have a mesh yet and that might affect how they flow. Once I can get the shaders and mesh sorted, I will worry about the direction of flow and that initial rush over the end(100% could just be the shape of the CC tub that I am using)

Trying to mesh the particles following this tutorial:


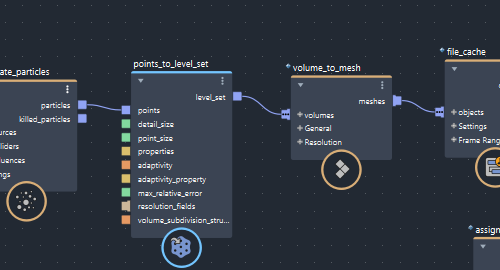
First step is placing a point_to_level_set node after the simulation, the particles will change to a dark grey colour if this is working. Next is a volume_to_mesh node after the level set.

Now you can link in the assigned_material node after the volume node to apply a shader to the particles. 


Like with ToonBoom nodes, you can select multiple nodes, right click and add a backdrop which gives you the shaded box to drag groups of nodes at one time, this is my attempt at a tidy graph with everything minimized while not in use. All the options are shown on the right under parameters so they dont need to be expanded really anyway.

I need to figure out why the particles/mesh are only showing up in the playblast and not the final render. Hoping its something simple.


Sunday, 28 March 2021

BSA703 26/3

Zoom call with Melanie Langlotz from GeoArGames -  Magical Park 2

Works with gov depts and inclusive for ppl with disabilities.

Base game mechanic development on games we played outside in our childhood and convert them into a digital format.

Add a timer to create excitement and adjustable difficulty. Usable mechanics include anything a gyro in your phone can measure - jumping, crouching, looking around etc.

Rube goldberg style park game, broken machine and the player has to run around and deliver collected items to each broken spot to repair the machine. Focus on using brain power, gender neutral, problem solving. Age range around 11yrs old. Bright and colourful, big(im thinking a massively over sized machine) with a fun payoff at the end once its fixed. The aim is to make them run as much as possible.

We get promotional material, video of gameplay, Melanie as a CV reference. Timeframe is delivery in the next month or two.

GeoARGames uses Valve management structure for the company. 

Modelling and animation requirements - specifically for Mobile platforms.

Small studio - aim to be a generalist, big studio - aim to be a specialist.

Send CV to Rach with showreel(eep this needs work) for next semester project.


The density colour tutorial still hasnt worked, I have chucked a basic surface shader on and this gives it a rather flat colour but its progress. After talking to Rach I think I am going to have to bite the bullet and learn the bifrost graph from the beginning.

Thursday, 25 March 2021

BSA703 25/3

 Ok so switching tactics. The room filling was good to practice locating settings etc but not actually going to be useful for the final product. 

Swapping to an overflowing bathtub is more productive as this will be simulated in the animation. Trying to get a smooth overflow is proving to be tricky as the water velocity keeps making it fly over the edge.

 A cool effect but not what is needed for this project.

The other issue as seen in this image is that if the water layer is too thin, it becomes patchy as if the water is very viscous. The next attempt will have a lower false bottom too see if that changes anything.

I discovered an tutorial that suggests adding a motion field with drag, this has really slowed down the water sim and I cant seem to get the cache system working at this point. 

So close yet so far. This is with drag = 0.5 and normal drag = 0.2

At this stage I am going to have to rebuild the scene as I think one of the settings I changed has ruined the processing and everything is stalling.

https://www.youtube.com/watch?v=4jDeRVBTpGg how to set up a cache using the bifrost graph, which I need to learn how to use first but putting the link here for future use.

https://www.youtube.com/watch?v=YaJnlEVwkAs&t=301s a trick to colour bifrost liquid

I definitely messed it up somewhere, the tutorial mentions bifrost material but my emitter did not have one so I think i need to go back to the beginning and find a little more detailed tutorial.


Tuesday, 23 March 2021

BSA703 23/3

Class Discussion on Learning Outcomes For This Paper

- Document individual and team contributions with analytical commentary via an online platform
    
- Use conceptual, aesthetic and technical skills and knowledge to communicate an original story/theme for screen

- Research and document applicable practices in relevant screen productions to inform project.


Research Production Pipeline

Wolfwalkers(https://www.youtube.com/watch?v=fZdv_f9f5Jo&t=100s)

     - Iker Maidagan(storyboard artist) https://maidagan.medium.com/wolfwalkers-the-story-behind-story-96a8ee746911

Storyboarding Review

    - 17 expert storyboard tips for TV animation https://www.creativebloq.com/advice/storyboard-tips

Storyboard tips:
  1. It's all about telling the story
  2. Build on the line of action
  3. One drawing equals one idea - we may have crowd scenes in our film, but the audience can only see one thing at a time, so in the storyboard process we need everything to be as clear as we can. 
  4. Draw cleanly for animation
  5. Find clarity in silhouettes
  6. Communicate the story through character poses
  7. Think like an actor
  8. Use the frame as the 'eye'
  9. Sketch thumbnails for a simple panel
  10. Establish the point of view with the horizon line/eye line 
  11. Use grids to help with object placement
  12. Create rough storyboard panel
  13. Clean up the storyboard
  14. Ensure continuity -Unless when we have weird shots
  15. Consider film time and editing - The storyboard artist and the director has to work together, Whether its the director saying what shots he would like, or the storyboard artists can pitch ideas, but it all has to be quick quick
  16. Compose for movement
  17. Think about animation layout
    - A Movie Storyboard Artist Reveals the Secrets of His Trade https://screencrush.com/movie-storyboards-2/ Gabriel Hardman has been a Hollywood storyboard artist for the last two decades, this link is showing the storyboard panels for 10 of his most well known projects with a behind the scenes sneak peek of the process.


Social Media Advertising

There is a couple of ways we can take our social media, I really like the setup that the creators of Bojack Horseman took it (https://www.instagram.com/bojackhorseman/). They created an Instagram account for Bojack and made posts as if he was a living person, utilising common post styles from other accounts. It seems like a fun way to create hype for the animation, without blasting potential viewers with the same release posters over and over. I feel like people would relate to a character more than artist BTS posts.

BSA702 14/7

 arrays and lists Quick and Easy Galaxy painting  great tutorial I found when I was looking for a background for my pitch tomorrow. I want t...